.jpeg)
Summarize this article with:
- In a RAG-based system, the LLM effectively becomes a reasoning engine that consults your documents for each answer.
- For instance, Eden AI built a RAG-powered Discord chatbot that allows users to ask questions about the platform—such as pricing, providers, features, or how to use the API—and get immediate,...
- Embeddings Provider: Choose which model to use for generating embeddings from your document text.
- - `llm_provider` and `llm_model` specify which LLM to use for generation (this should match what you set in the project; Eden AI allows overriding, but generally you’ll use the one configured).
- Use RAG to Chat with PDFs: Build Your Own PDF Chabot with LLMs enables developers and businesses to automate workflows, improve decision accuracy, and integrate AI capabilities directly into...
Ever wanted to talk to your documents? Retrieval-Augmented Generation (RAG) makes it possible by letting you use RAG to chat with PDFs through a chatbot that finds answers from your files. In this tutorial, we show developers (especially at startups and SMEs) how to combine RAG with Eden AI’s unified API to build an LLM-powered chatbot that can interact with your PDF documents, step by step.
What is Retrieval-Augmented Generation (RAG)?
Retrieval-Augmented Generation (RAG) is a technique that combines large language models (LLMs) with a retrieval system to provide accurate, context-grounded answers.
Instead of relying solely on an LLM’s training data (which may be outdated or hallucinated), RAG augments the model with external knowledge from your documents.
Here’s how the core mechanism works:
1. Indexing (Document Ingestion)
You load your documents (e.g. PDFs) and split them into chunks (pieces of text). Each chunk is then converted into an embedding (vector) – a numerical representation capturing semantic meaning. These vector embeddings are stored in a vector database (vector DB) for fast similarity search. This prepares a knowledge index of your PDF content.
2. Retrieval
When a user asks a question, the query is also transformed into an embedding. The system compares this query embedding against the stored document vectors (usually via cosine similarity) to find the most relevant chunks. In essence, it searches your PDF data for passages that are semantically closest to the question.
3. Generation
The retrieved text chunks (the relevant passages from your PDFs) are then fed into an LLM along with the user’s question. The LLM uses this augmented context to generate an answer that is grounded in the content of your documents. By design, the answer should stay factual and refer back to the provided data rather than making things up.
For a deeper dive into how RAG works, check out our full 2026 Guide to Retrieval-Augmented Generation (RAG) on the Eden AI blog.
What does RAG add to LLMs?
RAG provides up-to-date, specific knowledge to the model at query time, without needing to fine-tune the LLM.
This is essential for custom document interaction because it ensures the chatbot’s responses are based on your PDFs (trusted data) rather than the model’s limited memory or training data.
In a RAG-based system, the LLM effectively becomes a reasoning engine that consults your documents for each answer. This greatly improves accuracy and reduces hallucinations.
In short, RAG allows you to build a RAG system to chat with LLMs that have the exact knowledge from your PDFs when responding, letting you talk to your documents with RAG confidently.
Business Use Cases for RAG-Based Chat with PDFs
RAG-based chatbots that can interact with PDFs unlock many practical use cases across industries.
Here are a few examples:
1. Internal Knowledge Base Access:
Companies can build a chatbot for employees to query internal policies, manuals, or guides. Instead of searching manually through PDFs and webpages, employees can ask the chatbot and get precise answers with references, to boost productivity and onboarding.
2. Regulatory Compliance & Legal Research:
Organizations operating under strict regulations—such as finance, healthcare, and legal—use RAG-based systems to streamline access to dense and constantly evolving policy documents. A RAG-powered assistant can retrieve the latest compliance rules, legal clauses, or internal procedures from both internal and external sources.
At Eden AI, for example, we’ve implemented a Legal Chatbot that allows users to instantly search through our data privacy and terms of use documents, including those from our third-party API providers. Instead of scrolling through multiple PDFs or trying to decode legal jargon, users can now simply ask:“Does OpenAI store user content through Eden AI?”.
This approach not only improves transparency and user trust, but also aligns with regulatory compliance efforts like GDPR, CCPA, and industry-specific standards.

3. Customer Support Chatbots:
RAG can dramatically improve customer support by turning product documentation, FAQs, and onboarding guides into a searchable knowledge base. Instead of relying on keyword-based search or waiting for a support agent, users can query a chatbot that retrieves precise answers from your content.
For instance, Eden AI built a RAG-powered Discord chatbot that allows users to ask questions about the platform—such as pricing, providers, features, or how to use the API—and get immediate, context-aware answers from the company’s indexed documentation.
Users in the Discord community can type natural language questions like: “Which AI providers support OCR?” and receive answers pulled directly from official docs—without needing to leave the chat or browse the website. This drastically reduces friction in support and enables real-time, self-serve onboarding for new users.

4. Research and Data Analysis Assistants:
Whether in academia or business, you might have large PDF reports or data sheets. A RAG chatbot can be tuned to act as a research assistant – for example, pulling facts from financial reports, summarizing technical whitepapers, or answering questions from medical research PDFs. This use case overlaps with the above: the key idea is leveraging your proprietary documents as the knowledge base for an AI assistant.
These are just a few scenarios; essentially any domain where critical information is locked in PDFs or text files can benefit from a RAG-based chat system. By grounding LLM answers in your data, you get a chatbot that is both conversational and tailor-made for your content.
Step-by-Step Tutorial (API-Based)
In this tutorial, we’ll create a RAG project on Eden AI, index a PDF, and build a chatbot that can answer questions from that PDF. We will highlight how each step corresponds to the RAG flow (indexing, retrieval, generation).
Setup Overview
To implement this, we’ll use Eden AI, a platform that provides a unified API for various AI services (LLMs, embeddings, image analysis, and more). Eden AI simplifies the heavy lifting needed for RAG by offering all the components in one place:
- Managed Vector Database: You don’t need to set up your own vector DB servers. Eden AI offers built-in options (like Qdrant or Supabase) to store your embeddings, or you can plug in your own database if desired. This managed store will hold the indexed vectors of your PDF content.
- Model Orchestration: With Eden, you have access to many AI providers through one API key. For example, you can use OpenAI’s models for embedding and GPT-4 for the LLM, or switch to other providers (Cohere, etc.) with a configuration change. Eden AI handles the API calls to those providers behind the scenes, so you only interact with Eden’s unified API. No need to juggle multiple API keys or SDKs – one platform handles it.
- Unified API & SDKs: All operations (indexing data, asking questions) are exposed as simple REST endpoints or via Eden’s SDK. This means you can easily integrate the RAG chatbot into your app or workflow with standard HTTP requests. Eden AI’s portal also provides a web interface to configure and test your RAG pipeline without writing code.
For full implementation details, you can consult the official Eden AI documentation, which includes guides, API references, and SDK examples.
You can also follow this step-by-step video tutorial on YouTube, which walks through the entire process of setting up a RAG chatbot with Eden AI.
Step 1: Sign Up on Eden AI and Get an API Key
RAG Phase: (Setup) – Before indexing or retrieval can happen, you need access to the platform.
First, create an Eden AI account if you haven’t already. Go to the Eden AI sign-up page and register. Once logged in, you can find your API key on the dashboard (look for an “API Key” section – it’s a long string of characters). Copy this key; we’ll use it for API calls.

Note: The API key is used in an HTTP header to authenticate your requests. Eden AI uses a Bearer token system – for example, you’ll include Authorization: Bearer YOUR_API_KEY in your REST calls. Keep your API key secret (treat it like a password).
Step 2: Create a RAG Project (Configure Models and Vector DB)
RAG Phase: (Setup & Configuration) – This is where we configure how indexing and generation will work by choosing models and database.
Eden AI’s platform lets you do this through a web interface (either a Quickstart template or manual setup), but here we'll also use Python code to demonstrate the process via API.
Using Eden’s Web UI:
On the Eden AI dashboard, navigate to the Custom Chatbot (RAG) section and create a new project. You’ll be prompted to fill in some settings for your RAG pipeline:
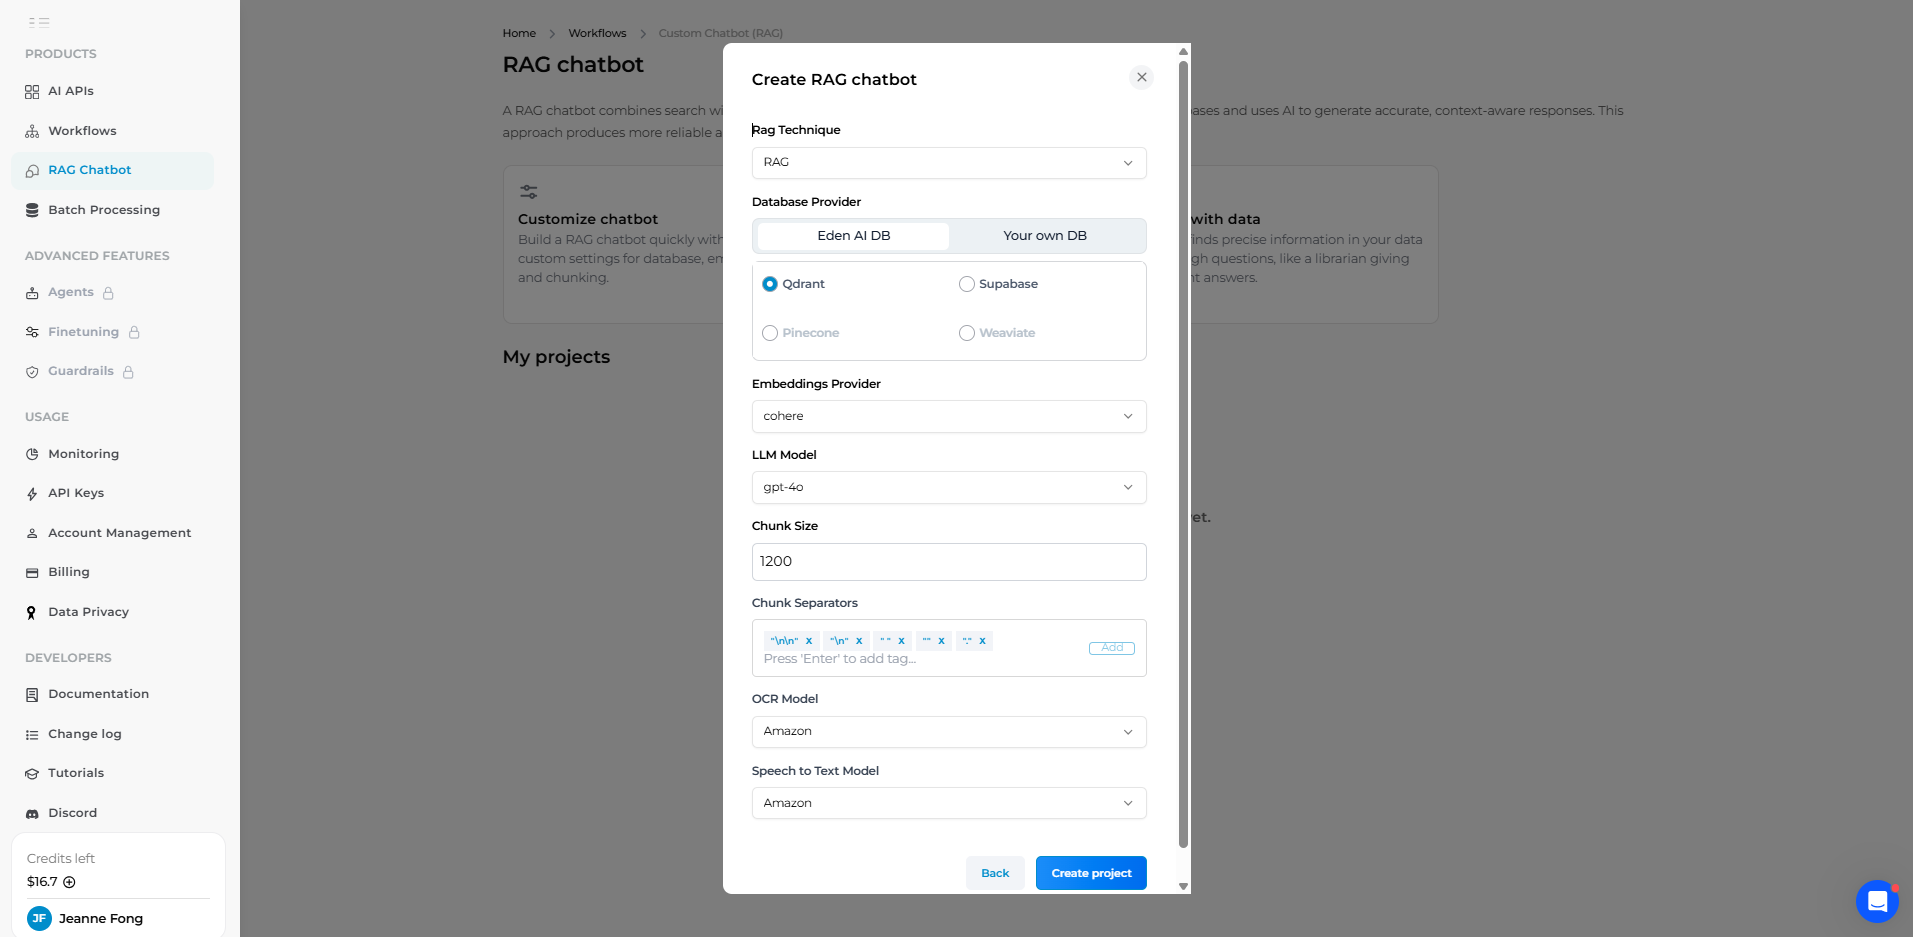
- Project Name: Give your project a name (e.g., “PDF Chatbot Demo”). This is just for your reference. The Eden platform will create a Project ID for you – keep note of this ID because it will be used in API endpoints to refer to your RAG project.
- Vector Database: Select a vector DB for storing your embeddings. Eden AI provides options like Supabase or Qdrant out of the box. For most use cases, you can choose the Eden-provided Qdrant (a high-performance vector store) so you don’t need any external setup. (If you already manage a vector DB, Eden allows entering a custom URL and key, but we’ll stick to the managed option for simplicity.)
- Embeddings Provider: Choose which model to use for generating embeddings from your document text. A common choice is OpenAI’s text-embedding-ada-002 model, which Eden AI can use if you select OpenAI as the provider. (You could also choose alternatives like Cohere, Mistral, OpenAI, Google, Jina, and more.) The embedding model converts chunks of text into vector form; using a high-quality model here improves retrieval accuracy.
- LLM (Chat Model): Choose a large language model to generate answers. In our case, we want a chatbot with strong capabilities, so OpenAI GPT-4 is a good pick. Eden AI lets you select from multiple LLMs (GPT-3.5, GPT-4, Claude, etc., depending on availability). We’ll use GPT-4 in this example to ensure our chatbot can handle complex queries. This model will be used in the generation phase to produce answers from retrieved info.
- Chunk Size: Set the chunk size (in characters or tokens) for splitting documents. Eden AI’s interface might default to something like 1200 tokens. This determines how large each text chunk can be when indexing PDFs. A larger chunk size means fewer chunks (less overhead) but each chunk uses more of the LLM’s context window; a smaller chunk size means more granular pieces that can match queries more precisely. A typical range is 500–1000 tokens; 1200 is reasonable for GPT-4’s large context.
- Chunk Separators: Define how the document text is split. By default, Eden AI will split on boundaries like sentences (periods
.), new lines, or paragraphs. You can usually leave this default, which means the PDF text will be chunked at natural breakpoints (end of sentences or paragraphs). This ensures chunks are semantically coherent. - OCR and Speech-to-Text (Optional): If you plan to upload images or audio, Eden AI allows you to configure an OCR model (for extracting text from images/PDF scans) and a speech-to-text model (for audio files). For example, you might choose Mistral for OCR if your PDFs are scans, and maybe OpenAI Whisper or AssemblyAI for speech-to-text. For pure text PDFs, these aren’t needed.
Once you’ve filled in these settings, click “Create Project”. Eden AI will spin up the project with the chosen models and vector DB. In the UI, you’ll now see your new RAG project interface.
Using the API:
Now, let's create a project using OpenAI as both the embedding and LLM provider (for example, using the text-embedding-ada-002 model behind the scenes for embeddings, and GPT-4 for answering).
We’ll use Eden AI’s default managed Qdrant database. In Python, you can use the requests library to call Eden AI’s REST API:
When executed, this will create a new RAG project on Eden AI. The response (project_info) will contain details of the project, including a unique project_id (a UUID) that identifies your knowledge base and configuration. Make sure to note this project_id – we’ll use it in subsequent API calls.
Congratulations – you’ve set up the foundation! At this point, you have an empty chatbot with no data. Next, we’ll index your PDF.
Step 3: Upload PDF Files (Indexing)
RAG Phase: (Indexing) – Now we feed documents into the system, which will be embedded and stored in the vector DB.
With the RAG project created, you can add data to it. Eden AI supports multiple data formats – you can paste raw text, or upload files like PDF, audio (mp3), CSV, even web page URLs. For our use case, we’ll upload one or more PDF files.
Using Eden’s Web UI:
In the project interface, find the Data section where you can upload documents. Simply drag-and-drop your PDF or click to upload. The platform will automatically handle extracting the text from the PDF, chunking it, and creating embeddings for each chunk.

For example, if you had a PDF of contacts list (as in our test), you upload it and wait a moment for processing. Once uploaded, Eden AI will show that the document’s content has been indexed (often you can see the number of chunks stored).
Using the API:
Alternatively, you can add documents via a REST API call. Eden AI provides an endpoint to upload a file to your RAG project. Here’s how you could do it in Python (using the `requests` library):
This add_file API call sends the PDF file to Eden AI. The service will process the file just as the UI does: splitting it into chunks and generating embeddings to store in the vector DB.
If the request is successful, you should get a 200 status code and possibly a JSON response confirming the upload. (You can also upload multiple PDFs – just repeat this step for each file. Eden will combine all their chunks in the same vector index.)
At this point, we have indexed the PDF content. Under the hood, each chunk of your PDF is now represented as a vector and stored in the project’s database. We’re ready to ask questions!
You can repeat this step for all your documents – e.g., upload multiple PDFs or mix in text and URLs. Eden AI will maintain a collection of all these chunks as the knowledge base for your chatbot.
Note: If using the Eden AI web portal, you can manage and inspect the chunks in the UI (view chunk content, delete unwanted chunks, etc.), but via API this management can be done with endpoints for deleting or querying chunks if needed.
Step 4: Set a System Prompt (Customize Generation)
RAG Phase: (Generation setup) – This step is optional but recommended to guide the behavior of the LLM when it answers.
A system prompt is like an instruction or persona given to the chatbot’s language model. It helps define how the bot should respond.
Using Eden’s Web UI:
For example, you might want the bot to respond formally, or to always cite the source, or to adopt a certain role (like “act as a helpful tutor”). In Eden AI’s interface, you’ll find a section for System Prompt for your bot.
In our case, let’s define the system prompt to suit a technical assistant that will answer questions about our PDFs.
For instance, if our PDFs are technical manuals, we might set a prompt like:

Once saved and enabled, this system prompt will be applied to the LLM on each query. Essentially, Eden AI will prepend these instructions to the conversation so the LLM knows how to behave.
Using the API:
You can set the system prompt through the API by calling the bot-profile endpoint with a JSON payload containing the text of your prompt. (There is also a name for the profile and a model field which typically should match the LLM you chose, e.g., "gpt-4".)
Here's an example API call:
For simplicity, you could also skip this step – Eden AI will use a default system prompt if you don’t provide one. However, crafting a good system prompt is highly recommended to ensure the chatbot responds in the desired manner (correct tone, context, and boundaries).
Step 5: Test Your RAG Chatbot via the UI (Retrieval + Generation)
RAG Phase: Retrieval & Generation – Now that your onboarding content is indexed and your LLM is configured, it’s time to test your chatbot to ensure it returns relevant, grounded answers.
Navigate to the Chat section of your RAG project. You’ll find a live chat interface similar to ChatGPT where you can type a user query and observe the model’s response. Ensure the correct LLM is selected (e.g. GPT-4 as configured in Step 2), and that your onboarding handbook has been fully processed and indexed.
Let’s try a practical question based on the indexed PDF:

Once submitted, Eden AI will:
- Convert the query into an embedding
- Perform a similarity search in the vector database to retrieve the most relevant chunks from the onboarding PDF
- Combine the query and retrieved chunks into a prompt
- Send the prompt to the LLM
- Return a generated answer
In our test, the response is grounded in the onboarding document, directly quoting the development setup section we included. If your system prompt is configured (e.g. “Act as an internal assistant. Always give concise, step-by-step answers for onboarding questions.”), you’ll notice the tone and format match your intent.
💡 You can verify what data was used to generate the answer by clicking the “Database Chunks” tab. This shows you exactly which parts of the onboarding PDF were retrieved. For example, the assistant may have pulled two chunks:
- One explaining the setup process
- Another detailing environment variables

This transparency makes it easy to debug and improve results. If the assistant ever returns off-topic responses or incomplete answers, you can adjust the chunk size, tweak the source content, or refine your prompt.
At this point, you’ve built your own internal Chat-Onboarding Assistant using RAG—and all without writing any vector DB logic or LLM wrappers.
Step 6: Integrate the RAG API into Your Application (Retrieval + Generation)
RAG Phase: (Retrieval & Generation via API) – Finally, to use this chatbot in your own app (web application, Slack bot, etc.), you’ll call Eden AI’s API from your code.
There are two primary API calls you’ll make in a typical interaction: one to add documents (which we covered in Step 3 with `add_file`), and one to ask questions. Since we’ve already uploaded the PDF, we can go straight to querying.
Eden AI provides an `/ask_llm` endpoint for RAG queries, which handles the retrieve-and-generate operation on the backend.
Essentially, this single API call will take a user question, find relevant document chunks from the vector store, and return an answer from the LLM.
Here’s a simplified example in Python using `requests` to ask a question:
In the payload:
- `query` is the user’s question.
- `llm_provider` and `llm_model` specify which LLM to use for generation (this should match what you set in the project; Eden AI allows overriding, but generally you’ll use the one configured).
- `k` is how many chunks to retrieve from the vector DB (here 3, which is a common default). The API will return an answer based on these top-k relevant chunks.
The response will typically contain the answer text, and it may also include the retrieved documents or other metadata depending on Eden’s API format.
For instance, you might get a JSON with the answer and maybe references to the chunk IDs used. You can format or display the answer as needed in your application’s UI.
Now you have the power of your RAG-based chat with PDFs accessible via API.
With the integration in place, your application now essentially has a “ChatGPT, but with my PDFs” feature.
The chatbot will always refer to the PDF content you provided when answering questions, making it highly specific to your data and useful for your users or team.
Step 7: Embed the Chatbot on Your Website (Optional UI Integration)
RAG Phase: Full System Deployment – Once your chatbot is functional via the API or Eden UI, you can make it accessible to end users by embedding it directly into your website or app.
Eden AI provides a ready-to-use embed script that works out of the box. Just paste the following code snippet into your site’s HTML, inside the <body> tag:
✅ Don’t forget to replace {project_id} with your actual Eden AI project ID.
This script will automatically:
- Load the chatbot UI on your site,
- Connect it to your RAG project,
- Use the configured LLM provider (e.g. OpenAI GPT-4),
- And let users ask questions in real time.
You can place this widget anywhere: in a product dashboard, an internal documentation portal, or even a customer support page. It’s ideal if you want to deploy your RAG chatbot with zero front-end coding.
If you want full UI customization, you can also build your own frontend and call Eden AI’s RAG API (`/ask_llm`) directly.
Conclusion
Retrieval-Augmented Generation enables you to chat with your PDFs in a truly effective way – bridging the gap between raw data and intelligent Q&A. By indexing your documents into a vector DB and leveraging an LLM for natural language responses, you get the best of both worlds: relevant, up-to-date information with the fluency of a large language model.
In this tutorial, we walked through the full RAG flow: loading and splitting a PDF, embedding and storing it (indexing), real-time retrieval of relevant text, and generation of answers by an LLM. We also showed how Eden AI’s unified API makes this process much simpler for developers.
Eden AI’s advantages are clear – it handles the infrastructure (vector storage, model integration, OCR, etc.) and offers a clean API and interface to manage it. This means you can focus on building the user experience (whether it’s an internal tool, a customer-facing chatbot, or a feature in your SaaS) rather than plumbing the AI components together. With built-in support for multiple providers and a generous free tier to start, trying it out is low-friction.
Now it’s your turn: gather a few PDF documents (user manuals, policy docs, research papers – anything you want your chatbot to learn) and give Eden AI a spin. In just a few steps, you can have a custom RAG-based chat with PDFs up and running. We encourage you to experiment with system prompts and different model settings to tailor the bot’s behavior. With RAG, “talking to your documents” is not science fiction – it’s a practical feature you can implement today. So go ahead and start building your own PDF chatbot with Eden AI, and unlock new value from your documents!
Happy coding! 🗒️🤖✨

.jpg)

.jpeg)
.jpeg)